Be yourself; Everyone else is already taken.
— Oscar Wilde.
This is the first post on my new blog. I’m just getting this new blog going, so stay tuned for more. Subscribe below to get notified when I post new updates.
Be yourself; Everyone else is already taken.
— Oscar Wilde.
This is the first post on my new blog. I’m just getting this new blog going, so stay tuned for more. Subscribe below to get notified when I post new updates.
The Hyper API provides a collection of functions that you can use to simplify your interactions with Tableau extract files (hyper). To build new extract files, or to open existing files, you can use the API to upload, remove, edit, or read data from those files. Using Hyper API , developers and administrators may do as follows.
Features of Tableau Hyper API
The Hyper API is the evolution of Extract API. The Hyper API allows developers and administrators to create.hyper files from those files and upload, remove, update, and read data. New features Hyper API comes with the following.
Reading, downloading, removing and inserting data into.hyper files;
Use full Hyper speed to create Tableau hyper files.
Loading files directly from CSV instead of writing code to do so.
It unleashes SQL’s ability to communicate with .hyper files.
Build extracts of multi-table data that suit your pattern.
The Hyper API provides access to new features, in addition to supporting the features of the previous Extract API 2.0 to create and update extract files.
Tableau Hyper API includes the means to communicate with files from the local.hyper sample.
Supported languages in Tableau Hyper API
The Hyper API supports exclusively 64-bit platforms. The Hyper API libraries are available for the programming languages as follows:
Although the Hyper API is intended to operate on newer versions of these languages, it may not be tested. In this article let us discuss about Tableau Hyper API in Python 3.6.
Tableau Hyper API to fulfill Python needs
The Hyper API supports only 64-bit interpreters. For example, a 64-bit version of Python is required.
The Python 3.6 and 3.7 features with the Hyper API.
While it is believed that the Hyper API also operates with newer versions, this was not checked through testing.
Setup with Python hyper API
1. The following instructions assume you have set up a Python virtual environment. See venv-Creation of virtual environments in Python Standard Library for more information on creating virtual environments.
2. Open a terminal and navigate to the directory at venv.
3. Using pip install the Tableau Hyper API module.
4. Pip have tableau Hyper API enabled
If you have previously installed Tableau Hyper API you can use the command below to upgrade to the latest version.
Pip Download Tableau Hyper API—upgrade
Installations running Linux require pip version 19.3 or newer. Note that pip versions 20.0 and 20.1 do not work due to pip problems.
Alternatively, the Python Hyper API package (.whl file) can be downloaded for your operating system. See Hyper API-Download and Release of Products.
5. Download examples, and try them:
Web hooks in Tableau Hyper API
A web hook is an API term that is becoming increasingly popular. As events could explain more and more of what we do on the web, web hooks are becoming ever more important. They are extremely useful for executing event reactions, in a resource-light way.
You can download the Postman collection directly from Github and create your own Web hooks to get started on this function. IFTTT is my favorite website for integration with other services. I use IFTTT for example to send me a Slack message to update my favorite Tableau workbook. Personally, it is the happiness formula.
Tokens for personal access in Tableau Hyper API
Now, let us talk about Tableau REST API and Hyper API authentication. Today, when you use our REST API to sign in to your server or Tableau Online, you need to submit your username and password in a file. In this YouTube video, learn how to sign in, what a REST API is, how it applies to the provisioning, permissions, and publishing, and more.
There is no need to type your password using Personal Access Tokens. This new token can be used to login to your server. There is no need to expose your account credentials in automation. But if your company uses SAML or some other form of Tableau authentication, you can also use the REST API.
The other benefits of the upcoming Personal Access Token tableau are as follows.
The Launching of the Hyper API, Web hooks and Personal Access Token are in beta format and will be ready for release in 2019.
Use Case of Tableau Hyper API
Link with the Hyper API to the data sources and write the data into extract files (in Tableau 10.5 and later in the.hyper file format. Write custom scripts which update or read data from existing extract files.
Benefits of Tableau Hyper API
You can use the Hyper API to build data extracts that enhance performance and provide offline access if you are able to link to your data. You can use the Hyper API to get the data into Tableau if you have data sources that are not currently supported. You can use the Hyper API to update the extract if you want to update data inside extract files. If you need to access data from an extract, you can now write a script which will read the extract data.
Conclusion
I hope you reach to a conclusion about Tableau Hyper API. You can learn more concepts of Tableau through Tableau online training.
To get started, you need the following items:
In this tutorial, you configure and test Azure AD SSO in a test environment.
To configure the integration of Workday into Azure AD, you need to add Workday from the gallery to your list of managed SaaS apps.
Configure and test Azure AD SSO with Workday using a test user called B.Simon. For SSO to work, you need to establish a link relationship between an Azure AD user and the related user in Workday.
To configure and test Azure AD SSO with Workday, complete the following building blocks:
Follow these steps to enable Azure AD SSO in the Azure portal.
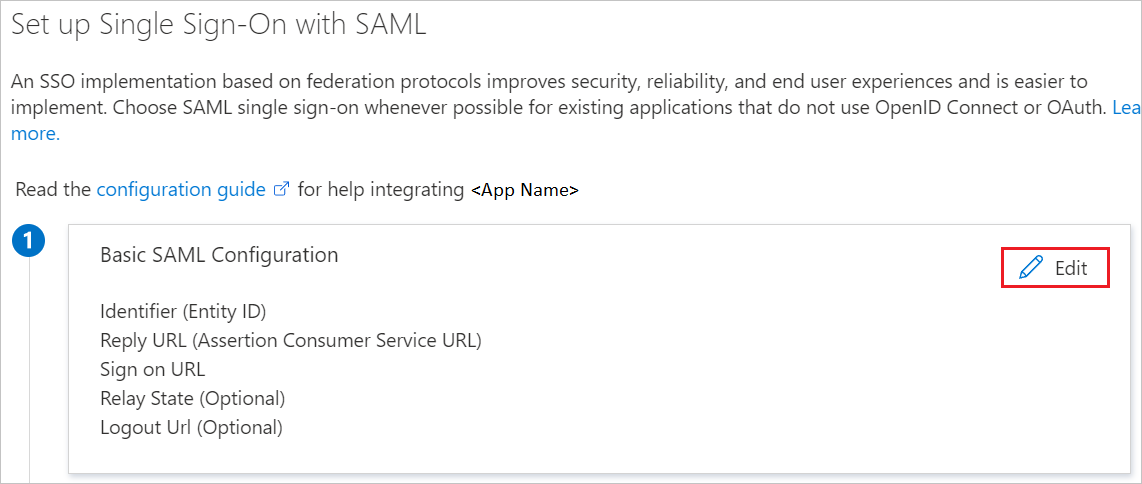
https://impl.workday.com/<tenant>/login-saml2.flexb. In the Identifier text box, type a URL using the following pattern: http://www.workday.comc. In the Reply URL text box, type a URL using the following pattern: https://impl.workday.com/<tenant>/login-saml.htmld NoteThese values are not the real. Update these values with the actual Sign-on URL and Reply URL. Your reply URL must have a subdomain for example: www, wd2, wd3, wd3-impl, wd5, wd5-impl). Using something like http://www.myworkday.com works but http://myworkday.com does not. Contact Workday Client support team to get these values. You can also refer to the patterns shown in the Basic SAML Configuration section in the Azure portal.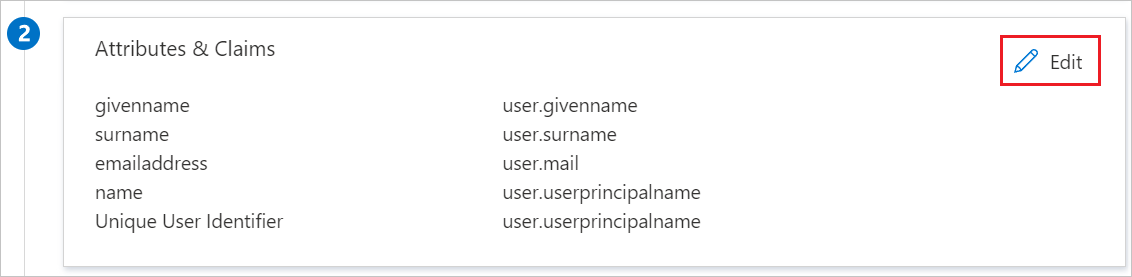 NoteHere we have mapped the Name ID with UPN (user.userprincipalname) as default. You need to map the Name ID with actual User ID in your Workday account (your email, UPN, etc.) for successful working of SSO.
 a. Select Sign SAML response and assertion for Signing Option.b. Click Save
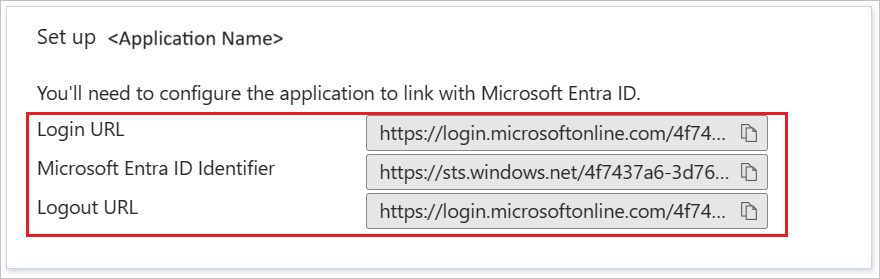
In this section, you’ll create a test user in the Azure portal called B.Simon.
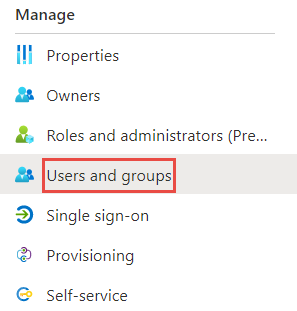
B.Simon.B.Simon@contoso.com.In this section, you’ll enable B.Simon to use Azure single sign-on by granting access to Workday.


 a. Click Add Row.b. In the Login Redirect URL, Timeout Redirect URL and Mobile Redirect URL textbox, paste the Login URL which you have copied from the Set up Workday section of Azure portal.c. In the Logout Redirect URL textbox, paste the Logout URL which you have copied from the Set up Workday section of Azure portal.d. In Used for Environments textbox, select the environment name.
In our effort to learn the new BI tool, it is crucial to learn about Tableau architecture. By knowing what’s under the hood, you will be able to have a good technical understanding of the tool. In this tutorial, we will discuss the Tableau architecture and understand its functioning in detail. Followed by the general understanding of Tableau’s working. Along with this, we will learn the Components and Architecture of Tableau Server.
So, are you ready to explore Tableau Architecture?

So, let us first get the bigger picture clear in our heads; let’s talk about the entire architectural framework that Tableau operates in. It can be categorized into three main segments. The segments are –
The first section of Tableau architecture is where a user can extract data from a gamut of data source options available like SAP, Oracle, Salesforce, Excel file, MySQL, Teradata etc. A user can establish data connection in two ways; a live data connection which sends instant queries to the data source and gets results instantly. Another way is to extract data from the data source and have a local copy of it as a temporary database. Data can be fetched through a live connection or extraction into both Tableau Desktop and Tableau Server Training.
Before getting to Tableau Server, let us first discuss the Tableau Desktop as it is the platform through which a user gets the ball rolling for further actions to take place. Because depending on the user’s request the actions for all the other architectural components are assigned. Tableau Desktop acts as an authoring tool where users create visualizations, workbooks, and dashboards using the data from the data source in Tableau. These workbooks or visualizations can be shared to users in many ways. It can be shared to static users (just to view), to a web or mobile clients, workbook packages can be shared to the Tableau Reader where users can view as well as edit the visualizations. Also, the visualization can be published or loaded into the Tableau Server.
The Tableau Server has many components working together as it manages a bunch of important processes. It has components taking care of the user and data security, a repository which stores all the visualizations published to the Server, a cache for performance improvement, a manager/automation to manage data loads and schedule updates, a presentation layer which is responsible for all the visualization/presentation related activities. The Tableau Server primarily serves the dynamic user base of the web and mobile customers interacting with the data on Tableau platforms.
The clients are the end users using Tableau through a web, mobile devices, on-cloud, on-premise, or on a command-line interface for development. These end-users interact mainly with Tableau Server for accessing workbooks or visualizations. The server components then work as per the client’s request and return the outcome.
As we discussed in the section earlier, Tableau Server is an important component in the Tableau architecture as it is thoughtfully designed to manage and execute crucial processes. It is important for us to understand what’s under the hood of Tableau Server as it is a core component and helps to understand Tableau better.
Let us go through the components of Tableau Server and learn how they work.
Gateway is a kind of web-server that helps clients communicate to the server via HTTP or https. The server receives incoming client requests and directs them to the appropriate server for action.
A gateway handles processes such as load balancing, traffic routing, URL rewriting, serving static files to clients, serving multi-thread processes etc. The gateway server used by Tableau is Apache Tomcat. Get more info From Tableau Training
Gateway interacts primarily with the application server, also known as a workgroup server. The application server deals with login processes, domain authentication, data authorization, user or group permission management, content searches, etc. It works in close association with the server’s repository and handles the data access operations. Also, it renders processes related to the user interface other than the visualizations which are the work of the VizQL server. The user interface is the page that gives the users an overview of the workbooks and projects they have access to.
The repository in Tableau Server stores server metadata related to users, permissions, assignments, groups, and projects. Along with the metadata, it stores visualizations in flat files (TWS, TDS), and performance data for auditing. Whenever a server service or component demands for metadata, it is provided from the repository. Also, it cooperates with the active directory to provide useful information to the app server for login verification processes.
It is an important component of Tableau Server as it is responsible for loading all the visualizations that you see and work with on Tableau. It has an in-built caching for performance improvement and editing tasks. Whenever a user requests a visualization or wishes to update an existing one, the request received by VizQL is first converted into an SQL statement and sent down to the data sources via respective data source drivers. The requested data sent back from the data source comes to the VizQL server again, where it is processed with some final touches of additional calculations and sent to the user. Any new visualization coming from the data source is cached in the VizQL for further use.
The data engine is another efficient component which handles processes related to Tableau data extract (TDE). It is invoked only when a query is shot, which involves data from TDE. The data engine stores multiple TDEs and can run on multiple servers maximum 2). It also attends multiple requests parallelly at a given point of time. The data engine hosts the piece of data in-memory extracted from the TDE upon getting a request from the user.
Backgrounder is an essential multi-process, a multi-process element that manages schedules for information refreshing and ensures proper functioning of the Tableau Server and Data Engine.
The data server helps in centralizing metadata management, driver deployment, and extract management. It also contributes to access control and serves as a proxy to the data sources. It hosts user queries and requests to prevent users from directly accessing the data source.
Two other important components are search and license. The search component manages the search indexing for the data in the repository. Whereas, the license component is responsible for the licensing and configuration of the Tableau server. Both these services run on the primary server of the Tableau’s server cluster.
Tableau Server is essentially a communication tool which shares data connections and visualizations with the end-users or clients. So, now that we have learned about the functioning of each component in a Tableau server. Let us understand how all these components work in tandem. For this, we will club the server components into layers or tiers. So, we have five layers or sections in the Tableau Server; customer data, data connectors, main components, gateway, and clients.
To get in-depth knowledge, enroll for a live free demo on Tableau Online Training
Edit your ServiceNow applications in Visual Studio Code with the help of the ServiceNow Extensions for VS Code.
The ServiceNow Extensions for the VS Code editor enables you to edit applications within your ServiceNow instance.

Edit your applications offlineUse Visual Studio Code to download and edit a local copy of your application. You can edit the application offline, and then synchronize again when your instance is available.Use Visual Studio Code JavaScript features to reduce development time and improve code qualityVisual Studio Code IntelliSense includes editing features such as code completion, code suggestions, and quick information. Use these tools to complete your coding tasks quickly and reduce errors. For more details on using IntelliSense in your applications, see IntelliSense in VS Code. The extension also supports Linting using ESLint. The same standard ESLint rules used in the ServiceNow instance are available. For more info Servicenow Training
Functions of ServiceNow Extensions for VS Code
The ServiceNow Extensions for VS Code include tools for developing on the Now Platform.
The extension adds several functions to your Visual Studio Code (VS Code) implementation. You access these functions through the command palette.

| Functionality | Description |
|---|---|
| Setup Now workspace | Create the project folder to work with ServiceNow applications. |
| Activate Now Extension | Activates the ServiceNow extension. |
| Create Now Project | Import existing ServiceNow applications to a Visual Studio Code project. |
| Sync Current Project | During development, synchronize all files between VS Code and the instance. Press CMD + OPT + S for MacOs and CTRL + ALT + S on Windows. |
| Sync Current File | Synchronize the current file you are working on. Press CMD + OPT + SHIFT +S for MacOS and CTRL + ALT + SHIFT +S on Windows. |
| Clear Credentials | Deletes the entered credentials in the Settings page. |
| Reset Project | Sets project to its original state. |
| Configure File Types | Modify the options selected in the metadata. Metadata determines which elements of your application you want to synchronize with VS Code. |
| Add Custom File Types | Add file types to your project using the Custom File Types wizard. |
| Select Application | Switch between application within the workspace in VS code. Press CMD + OPT + A for MacOs and CTRL + ALT + A on Windows. |
| Select Update Set | Select an update set. Changes synchronized to your instance are applied to the selected update set. Press CMD + OPT + U for MacOs and CTRL + ALT + U on Windows. |
| Create New File | Create records in your application. |
| Global File Search | Find files within the instance. Press CMD + OPT + F for MacOs and CTRL + ALT + F on Windows. |
| Run Background Scripts | Run a background script on your instance. |
| IntelliSense | An IntelliSense code-completion aid available for Glide APIs. |
To get in-depth knowledge, enroll for a live free demo on Servicenow Online Training

As companies grow, the need to integrate data between different platforms becomes more inevitable. For instance if you’re working in ServiceNow and you have a partner or a client who uses Jira, then a ServiceNow Jira integration seems to be the best solution for seamless collaboration.
So in this guide, we will discuss the need to integrate ServiceNow Incidents with Jira Issues. (Although this process can also be applied to other entities, like Problems, Cases, Change Requests, etc.)
We will cover why admins set up the ServiceNow Jira integration in the first place. How to choose the right technology to configure the integration. And we will cover the step-by-step process on how to set it up. For more info Servicenow Training
Thinking of IT Service Management, ServiceNow has become a mainstream choice for CIO’s & the head of IT departments to consider.
Started as an innovative niche cloud platform to manage ITSM processes based on ITIL best practice, ServiceNow has gained enormous traction in recent years. They currently have more than 20.000 customers world-wide & are growing rapidly.
On the other hand, when thinking of Agile Software development, Jira sprints in mind immediately.
As part of the Atlassian product offering, Jira manages issues & projects for Software teams. And it integrates nicely with other Software development tools of Atlassian. In short, for many Software teams, Jira is the natural choice for Issue/Project management. This is especially true when other Atlassian products are used for Software Development too.
With the above positioning of ServiceNow & Jira in the IT Service Management & Software development space in mind, the need for integration becomes obvious.
Here I’ve summed up two examples of possible scenarios:
When designing an integration between two ticketing tools, three aspects always need to be considered:
To install Exalate on your ServiceNow instance, you’ll have to use an “update set”.
You can find the step-by-step instructions of the Exalate agent installation for ServiceNow on the following Exalate documentation page:
Installing the Exalate app on your ServiceNow instance
In order for Exalate to work, it needs to be installed on both sides of the integration.
This means you’ll also have to install Exalate on Jira. This will be the straight forward process as installing a Jira app.
The Exalate console provides a user interface for system administrators to configure & maintain the Integration.
After installing, the Exalate console should be directly accessible as an Application on the ServiceNow instance:

At the Jira side, similar configuration options are provided as an Application as well:
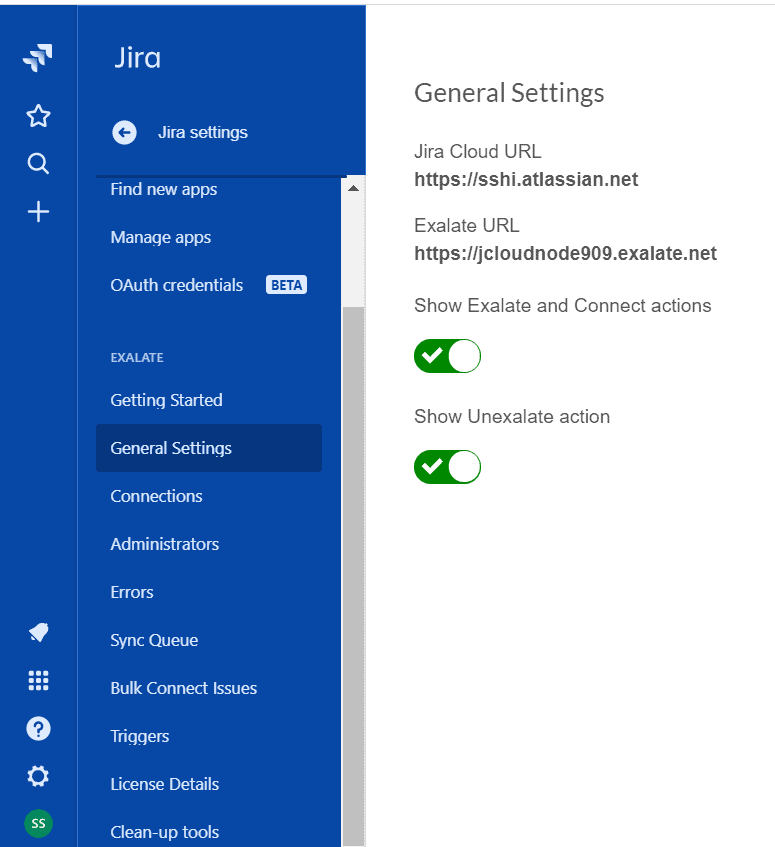
With the Exalate console you can, on the one hand, create/maintain your configuration. On the other hand, you can also view Sync Queues and check/resolve errors.
These capabilities will help to maintain the integration efficiently.
But, let’s move on to setting up a connection between your Jira and ServiceNow instance.
Once the Exalate agent is installed on both ServiceNow & Jira, you need to set up connections between the two Exalate agents.
Either side can initiate the Connection or else accept the Connection invitation from the other side.
But here’s a recap of what it boils down to.
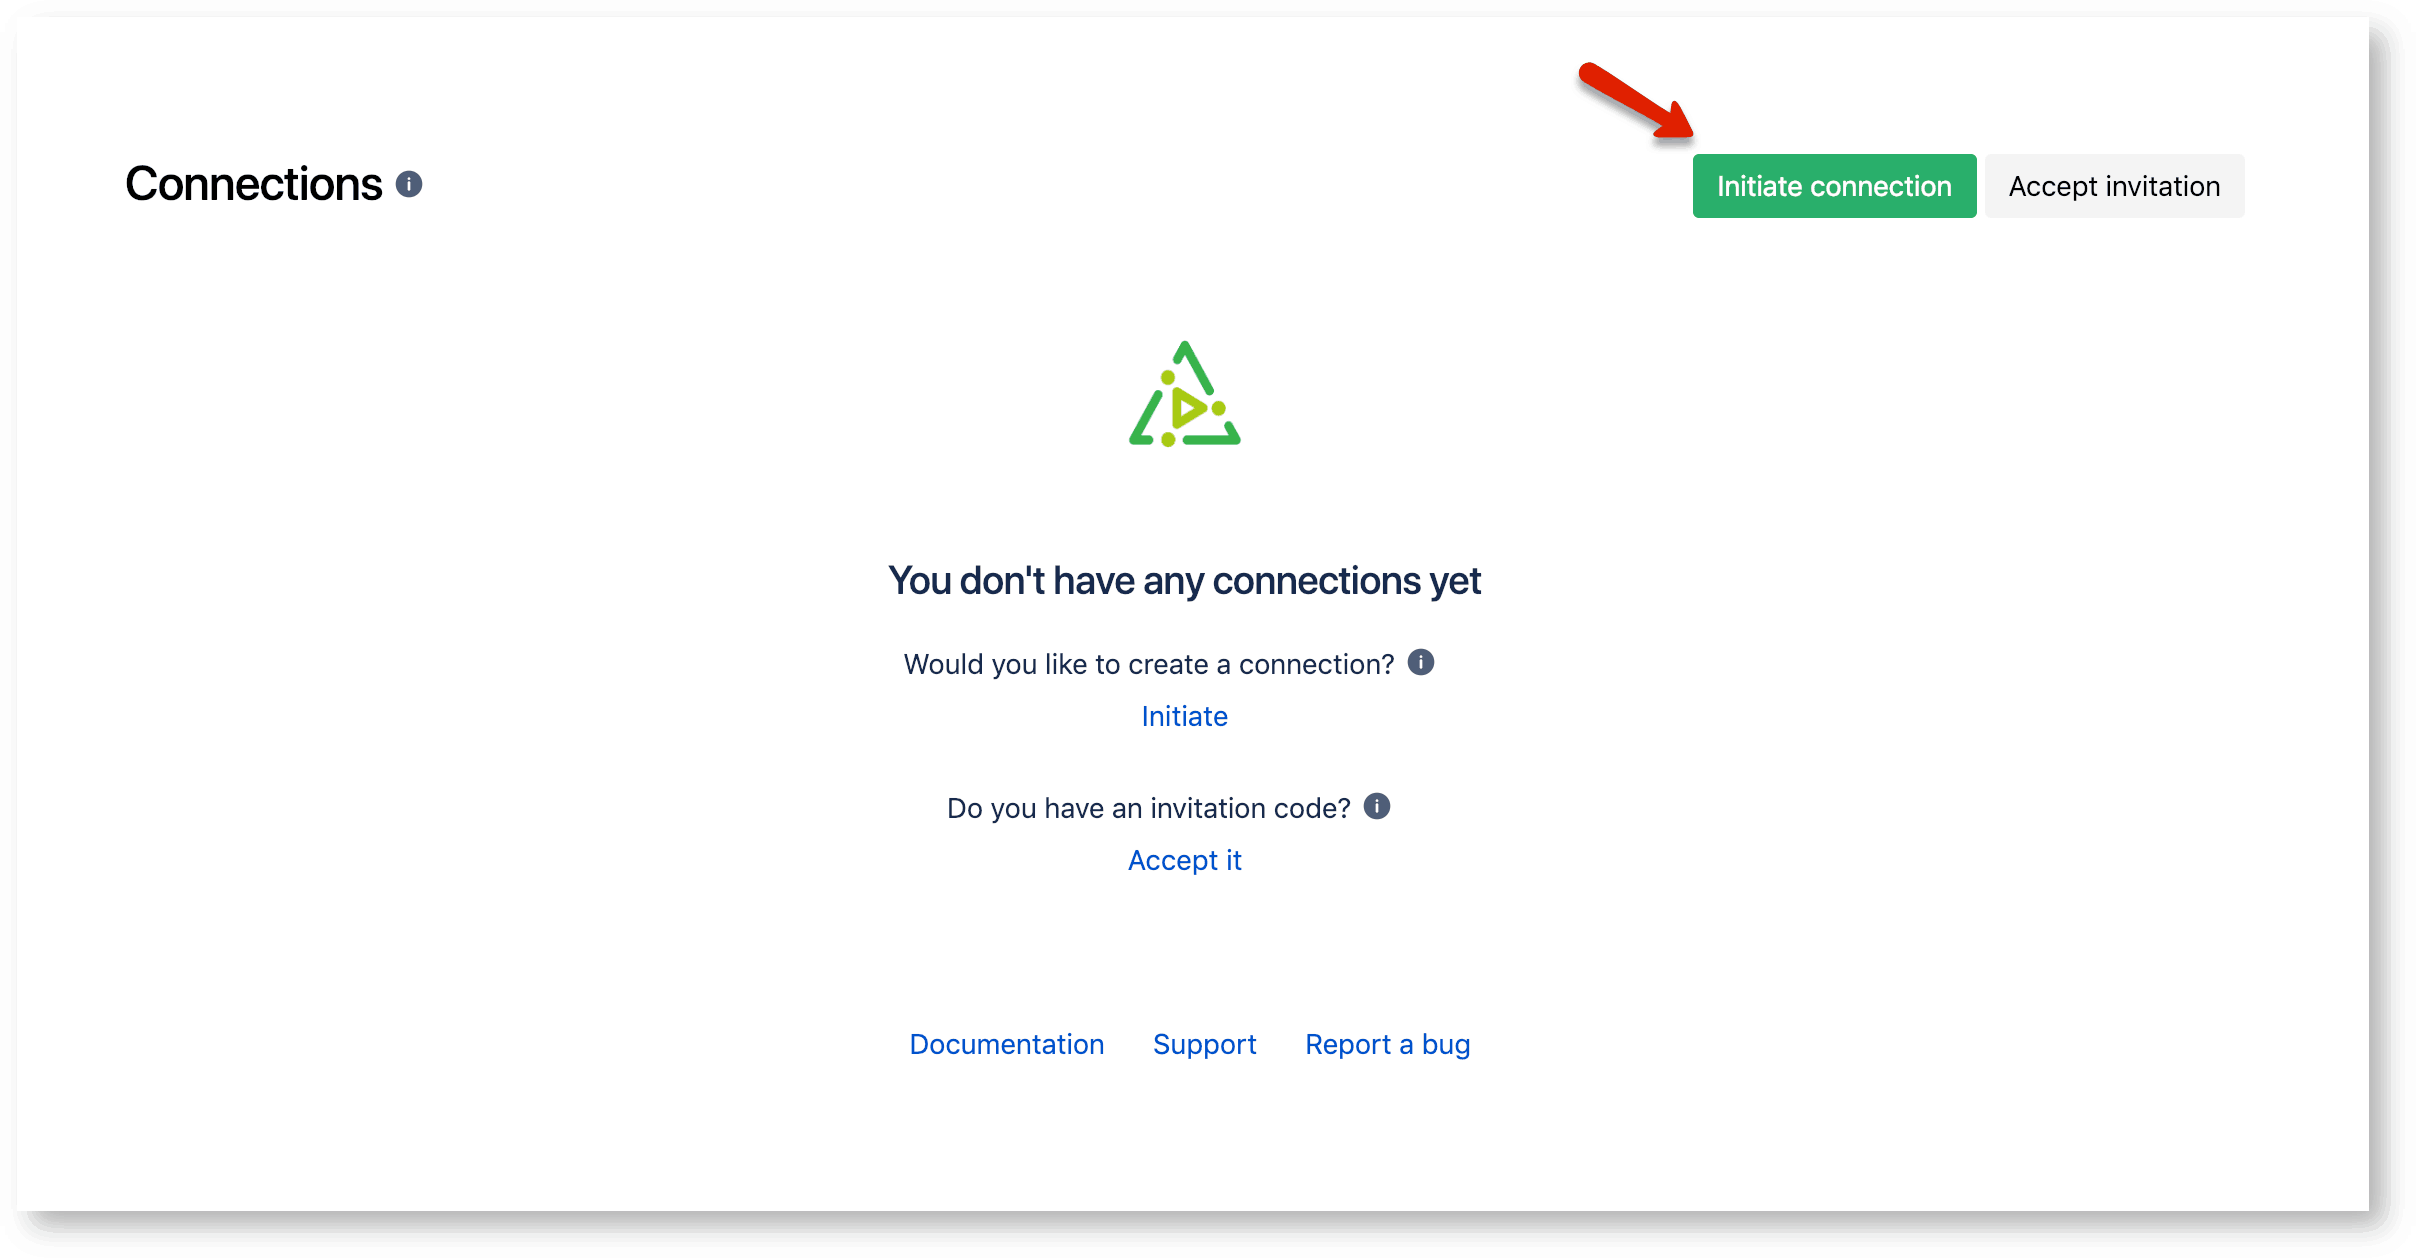
You’ll first have to Initiate a connection in the Connections tab.
You’ll then have to choose the connection type. That’s either connecting with the other side that’s accessible or not accessible.
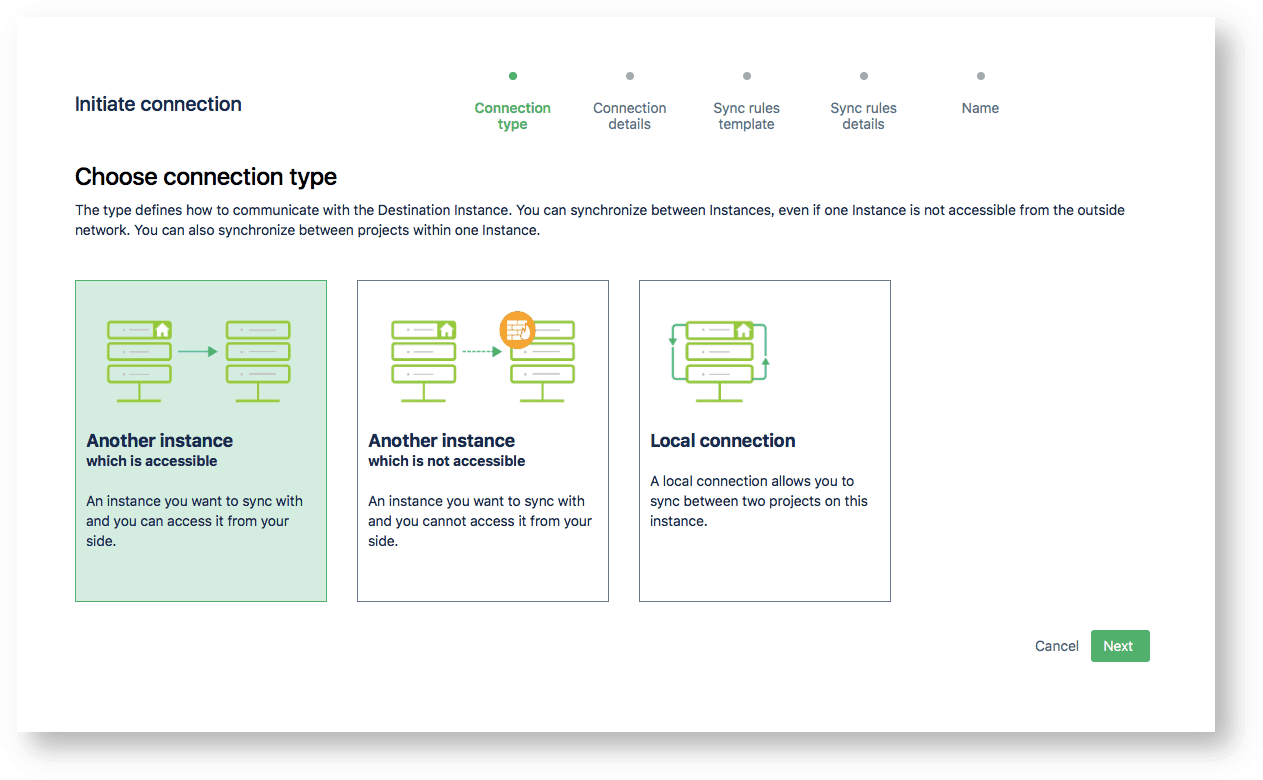
Then you’ll have to choose between the pre-existing sync rules templates. Don’t worry about configuring this or selecting the wrong one. You’ll be able to edit this later. We’ll get back to this in step 6. Learn more skills from Servicenow Developer Training
The only thing left to do here is to pick a connection name and “Initiate Connection”.

Quick note: you can toggle the Active option on and off, which means you can prepare a connection before you have a need for it.
This will generate an invitation code. You’ll have to copy this so the other side can accept the invitation.

That code you’ve just generated is what you will use to accept the invitation on the other side. So, move over to the other side, go to Connections and Accept Invitation.
Go ahead and past the code there:

The code will validate automatically once you’ve clicked Next.
Your connection type will be set automatically based on the invitation.
You’ll be able to configure the sync rules for this side separately, from the other side. This has been done on purpose, so each side will remain autonomous.
However, you do not have to configure this here yet. We’ll configure this later in Step 6.
After you’ve accepted the invitation and a connection has been established, we can move on to setting up a rule that will serve as a trigger for the synchronization.
Once a connection between ServiceNow and Jira is established, the main work of integration can start.
At this stage, close cooperation between the Incident/Issue manager is needed to determine when an Incident at the ServiceNow side needs to create an Issue at the Jira side or vice versa.
The agreement can be defined on ServiceNow Exalate & Jira Exalate independently, allowing all possible scenarios. However, it’s also possible that you’re an admin on both sides.
If the process managers have determined that whenever an Incident is assigned to an Assignment group called Jira ServiceDesk, an Issue needs to be created at the Jira side.
The Trigger defined in Exalate ServiceNow looks like the following:

If, at the same time, they also agree that whenever an Issue at the Jira has IssueType ServiceNow, it will create an Incident at ServiceNow for teams on ServiceNow to solve.
The Trigger defined in Exalate Jira looks like the following:

Once an Incident on ServiceNow fulfills the conditions defined by the Trigger, the ServiceNow Exalate will receive access to the Incident through the REST API.
What information is sent to the Jira Exalate is defined in the Connection Sync Rules -> Outgoing sync.
Here’s a screenshot of what it looks like:

The above example is an out-of-box, straightforward mapping. However, more complex mapping can be defined using groovy scripts in this section as well. Exalate provides a number of Script Helpers to reduce the effort to script yourself.
The incoming sync will determine how to interpret the information received.
The rules on how to interpret the incoming data are configured in the Connection Sync Rules as well.
On the ServiceNow Exalate, there is a distinction for when an Incident is created or updated.
In the example shown below, it is defined to store the Link to Jira Issue to the ServiceNow Incident correlation_id attribute. Incident correlation_name is set to Exalate.

Just like with outgoing sync rules, more complex mappings can be scripted.
Below is an example of mapping the ServiceNow Incident States with the Jira Issue Status. (Again Exalate Script Helpers can help reduce the scripting effort.)

Since we used Exalate to set up the Jira ServiceNow integration, you might have some questions about this solution.
Here I’ll explain a bit more about Exalate’s architecture and security.
The basic architectural setup of Exalate as integration enabler between two systems is depicted below:

In our scenario Tracker (Blue) would be your ServiceNow instance, Tracker (Red) would be the Jira Server or Cloud instance.
Tracker(Blue) and Tracker(Red) have a separate Exalate Agent dedicated to your ServiceNow/Jira.
Exalate is an intelligent middleware that transports data between ServiceNow & Jira.
The Security consideration is described in great detail in the following whitepaper, free for download: “Exalate Security and Architecture Whitepaper”.
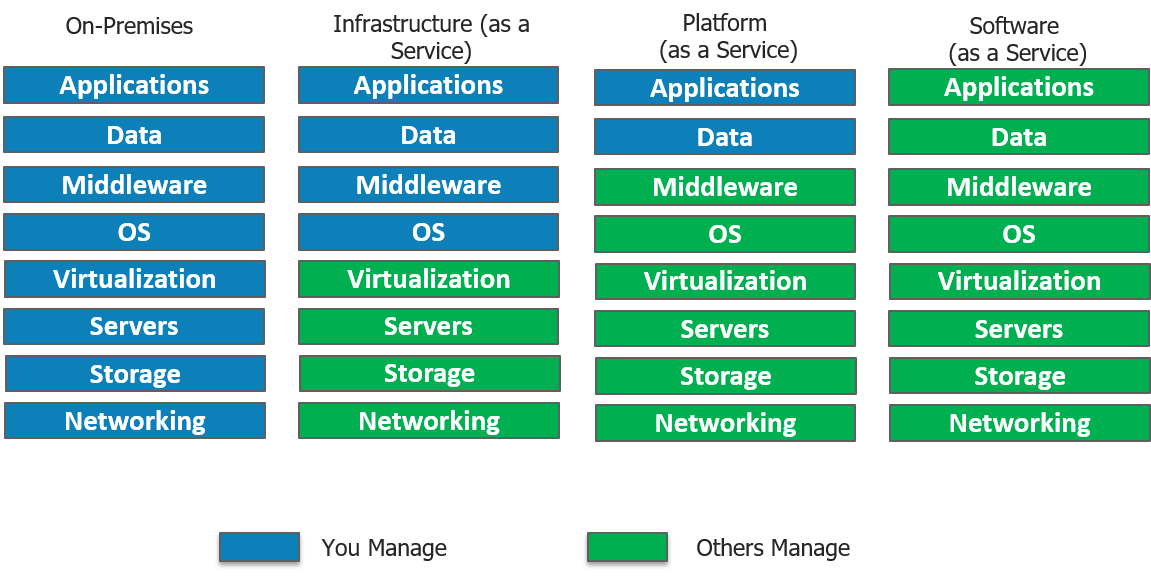
The below image explains the different deployment models Exalate is supporting.
Exalate for ServiceNow can be deployed either in the cloud or on-premise.

ServiceNow itself has a capability called IntegrationHub that allows reusable integrations with third-party systems and call them from anywhere in the ServiceNow platform.
Using the IntegrationHub requires you to get a separate subscription.
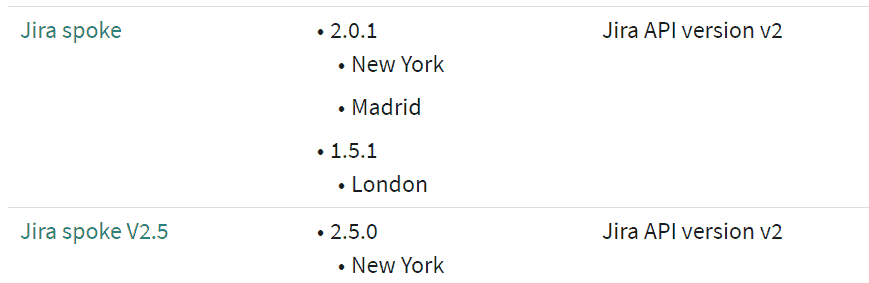
The Standard package of IntegrationHub includes a Jira Spoke with a (limited) number of Actions that allows ServiceNow to manage issues, users, stories, and groups in Jira. And it retrieves Jira data to use in a flow.
Jira spoke V2.5 uses bi-directional webhooks and subscribes to Jira with a ServiceNow callback URL.
So, why use a third-party tool, like Exalate, to set up the integration?
Below I’ve added some considerations:
To get in-depth knowledge enroll for a live free demo on Servicenow Online Training
ServiceNow provides service management for every department in your enterprise, including IT, human resources, facilities, field services, and more. We are excited to announce the availability of a Power BI content pack for ServiceNow that’s focused on incident management. The content pack gives you instant access to multiple reports and insights on your open, recently resolved, and recently closed incidents.

This post will explain how the Power BI content pack can help you analyze your ServiceNow incidents data. For additional details on how to get started, please see the Power BI help page.

To connect to the content pack, simply provide the URL to your ServiceNow instance, and sign in with your username and password. Once the connection has been made, Power BI will automatically create a dashboard, report, and dataset with data from your ServiceNow account. For more info Servicenow Training
The out-of-the-box dashboard offers an overview of insights included in the content pack, and you can select any of the tiles to drill down into the multiple pages of reports behind the dashboard. For example, selecting any of the tiles in the Open Incidents section will bring you to a report page dedicated to insights and metrics about your open incidents.

You can hover over the visualizations to see additional details, and select a visual to cross filter the rest of the page. You can also switch to edit mode, where you can edit or add additional visuals to your reports. On the right, you’ll see a list of all the tables and fields you have access to in the content pack. In this case you have seven different tables from which you can pull information.

From any of the reports, you can pin the visuals or tiles to the dashboard by hovering over them and selecting the pin icon. Pinning the visuals will prompt you to select a destination dashboard, allowing you to customize and combine data from multiple sources. For example, the dashboard below contains insights about website traffic, ServiceNow incidents, and product usage, all from different sources.

After the initial import, the dashboard and the reports will continue to update daily, and you can control the refresh schedule on the dataset. With the Power BI content pack for ServiceNow, you have an initial set of insights that you can use to explore your incidents data even further.
We’re always interested in hearing your feedback! Contact us at http://support.powerbi.com to let the team know about your experience, and if there’s anything we can do better. Any suggestions, including other content packs for ServiceNow, are appreciated.
To get in-depth knowledge, enroll for a live free demo on Servicenow Online Training
Think about something that’s important to you. Maybe it’s related to your work, or your family, or a hobby. For example, perhaps you’re interested in sports.
Let’s face it
These days there’s data floating around for just about every hobby or interest under the sun. For example, I’m a big fan of football and love digging into the data and statistics behind the game.
Here’s the problem: that data is a real pain to work with.
But good news! Tableau figured out a super easy way to get that data into any dashboard you can imagine with no coding required.
In this step-by-step tutorial, I’ll show you the background info you need to understand how it all works PLUS a super smart shortcut that will save you time and tons of frustration. Learn more from Tableau online Training
One of the great things that Tableau offers is an easy way to connect to your data. A new feature in Tableau 9.1 are web data connectors. Web data connectors are an easy way to import your data from an existing API directly into Tableau so that you can create dashboards very easily.

How Tableau Web Data Connectors work

How to get started with Tableau Web Data Connectors
Warning: building a web data connector from scratch is not all that easy. You’ll need to know:
One of the more complicated pieces of web data connectors is finding a place to host your WDC files. You’ll likely have HTML, JavaScript, and CSS files that need to be stored online so that others can use them. Github is the best option to store your source code securely so that others can access your files.
Okay, Part 1 and Part 2 really help you understand what Tableau Web Data Connectors are and why you’d want to use them.
Part 3 will show you how to bypass all of the technical challenges and just get the data you need without any coding at all using a tool called import.io
Why use Import.io?
Here’s the thing
The hardest part now will be finding the data you want. But if the data is on a public website (not behind a firewall or login screen) then you can use import.io to collect that data.
How to use import.io to get data into Tableau with no coding
To get in-depth knowledge, enroll for a live free demo on Tableau Training
With the Workday Cloud Platform the SaaS company is entering the Platform as a Service (PaaS) game. By giving developers open APIs to plug into the Workday applications (Human Capital Management (HCM), Financials, Planning) and underlying data models, they can start to build custom apps and extensions from Workday.
Speaking at Workday Rising in Barcelona this week, chief technology architect Jon Ruggiero said the goal is to provide customers with “the tools to design, build and manage business applications on the Workday cloud”.

All apps built on the platform come secure with Workday configurable security, no toolchain dependencies and all data used belongs to the customer, with no data usage fees. For more info Workday Training
Once opened up, developers will be able to get their hands on a set of open REST APIs, documentation and reference apps, all through the new developer site cloud.workday.com. This community site will also come with a developer console to manage resources and apps, as well as an API explorer tool.
Developers will also be able to get their hands on advanced capabilities, as Workday is exposing its machine learning algorithms and statistical models, as well as conversation service APIs like Workday Talk and Workday Bot later down the line to build these chat interfaces within Workday.
While the new open Workday platform is only available to design partners for now, developers can sign up for the Cloud Platform Community Group, or wait for general availability some time during 2018.
As the Cloud Platform isn’t generally available until 2018 the current use cases are only examples being created by design partners, but they give you an idea of what can be built on top of the Workday platform.
Presented at Rising by VP of technology product management, Erin Yang, the four initial PaaS use cases are:
Workday fully expects its partner ecosystem to take up the baton in terms of building on the cloud platform. Barbry McGann, SVP product management at Workday told Computerworld UK: “Opening up the platform allows us to look at our core competencies and what partners can develop in terms of vertical-specific applications and unique extensions.”
McGann admitted that an app marketplace, like the Salesforce AppExchange, is certainly a possibility down the line, where apps developed by partners could be packaged and shared amongst the wider Workday community.
FusionServer Pro intelligent server is designed to help enterprises handle the massive workloads needed in the digital age.
This is a natural progression for the SaaS company to becoming a platform company, and although Workday has been accused of being slow to open up its platform, Bhusri has been adamant that the company would not take the leap until it was ready.
In his own words: “We had to ensure our technology core offered rock-solid reliability and scalability as well as the flexibility to continually evolve with a rapidly changing business landscape”.
Only this week he added: “The move to cloud platform is different to anything we have done before and we are going to learn a lot over the next twelve months.”
Now we will have to wait and see what the response of partners, independent software vendors (ISVs) and customers is like and what they decide to build in this new ecosystem.
To get in-depth knowledge, enroll for a live free demo on Workday Online Training
ServiceNow had its roots set in ITSM since 2012. However, with changing technology and the advent of cloud, it created its niche as a cross-departmental platform which functions as an enterprise cloud solution which is built on top of all other applications. Its ability to create workflows which automate the process of data extraction makes it a unique offering in today’s cloud space.
ServiceNow has a raving customer base which returns to its platform each year. Let’s now look at the different cloud deployment models and where ServiceNow fits in.
ServiceNow which started off on a SaaS model catering to ITSM, has also ventured into PaaS cloud model, in which the entire organization’s business processes can be managed by a single system of record. ServiceNow provides the infrastructure needed to perform data collection, storage, as well as application development all on a single platform. Although ServiceNow does not provide an in-house Iaas deployment model it does support integration to Microsoft Azure which is an IaaS model.
It offers configuration management database (CMDB) along with service mapping which powers service-aware applications. Service mapping shows the dependencies amongst the organization’s assets. This leads to much-needed visibility into the business environment.
Great, now let us try to address the most essential question of this blog, what is ServiceNow?
ServiceNow was founded in 2004 and stepped foot in the ITSM (Information Technology Service Management) field and provided competition to established players like IBM and HP. Today it is not just limited to ITSM, even though it still forms a major part of its revenue. Now, it is has diversified into 5 major services which include IT, Security, HR Service Delivery, Customer Service and Business Applications. ServiceNow is an integrated cloud solution which combines all these services in a single system of record.
ServiceNow’s Vice President Dominic Phillips, in one of his keynotes, pointed out that while we are witnessing so much “disruption” in the consumer sector, there is a lack of efficiency in internal business workflows inside organizations.
In today’s digital era, the ease of access that Uber and Airbnb provide while booking a cab or reserving a table is the kind of experience ServiceNow wants to provide to its customers within the enterprise.
Let us now move forward to understand how ServiceNow works by looking at its architecture. Get now with Servicenow Certification
The majority of cloud service offerings today, run on the age-old Multi-tenant architecture like AWS, Azure, Salesforce, Oracle, etc. The Multi-tenant architecture creates a single instance which serves multiple customers. This usually deals with complex databases which demand frequent maintenance, often leading to unavailability of resources to customers. This is why ServiceNow has adopted a Multi-instance architecture.
Multi-instance architecture: A unique instance is created for each employee which maintains a separate resource stack. This gives us the freedom to deal with each user’s specific needs, enabling us to deal on a customer-customer basis. E.g. customer upgrades can be deployed with respect to compliance requirements as well as the enterprise’s current needs.
In our diagram shown below, 3 customers have unique instances each with an isolated pool of resources. What this means is, while the hardware is shared, the software: Application, Middleware and Database are all separately maintained. Data Isolation is a huge advantage. This is why the performance of one customer is not influenced by another customers instance. Neat, isn’t it?
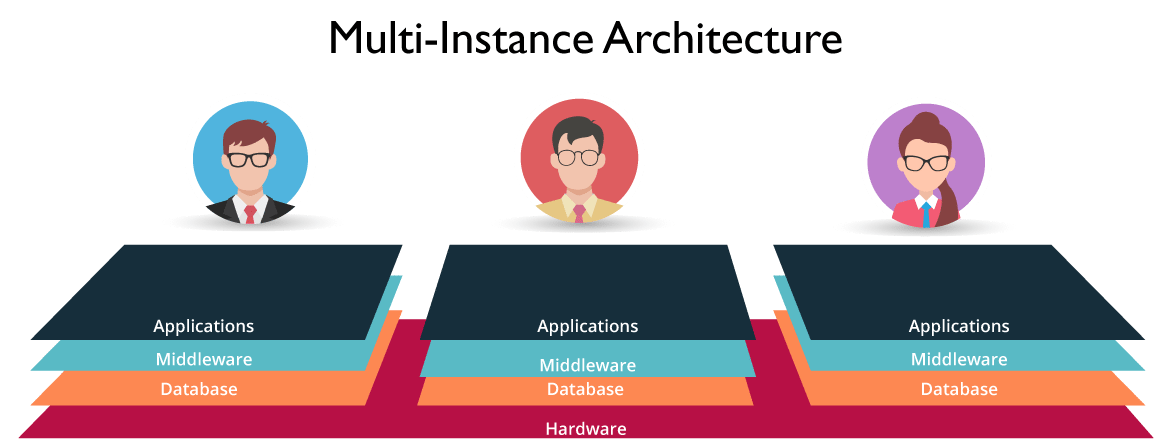
Figure: What Is ServiceNow – Multi-Instance Architecture
In this what is ServiceNow blog, let’s get an overview of the ServiceNow Applications.
A report found that 15 hrs out of 45 hrs in a work week are spent doing non-work related tasks. It was identified that this is due to the outdated ITSM software in use.
In ServiceNow, employees are provided with a self-service portal where they can avail IT Services by messaging the concerned department staff. ServiceNow was able to bring the ease of use of social media apps to the ITSM sector which was still lagging behind with legacy systems. Learn practical skills from Servicenow Course
With ConnectChat, the staff can reply in real time. This can be seen as an improvement over the traditional mailing system where messages had to be sent back and forth. This supports the sharing of files across departments. An employee can attach incident files as part of the conversation enabling technicians who can then directly look up the incident records and service the request. If a user is unsure which technician is on duty he can create a group with all technicians as members. Visual taskboards allow you to assign tasks to different departments with just a drag and drop gesture.
In spite of having a sophisticated security management mechanism in place for threat detection, when there is a security breach, most companies face an uphill task of resolving the problem.
ServiceNow uses structured workflows which helps prioritize risks based on their severity and their impact on the organization.
Threat research would normally take up to 45 minutes using spreadsheets and manual processing.
However, automated tools provide this information inside the platform which reduces the time involved to under 20 seconds.
Ever wondered how HR spends most of its time doing repetitive tasks like employee onboarding when they should actually be focusing on strategic tasks instead?
ServiceNow wants to do away with all that manual processing. These tasks span across different departments like IT, Facilities, Legal and Finance. ServiceNow’s single platform can be used to connect HR workflows with all these departments. Decision making is made easy with its tracking and trending tools. HR is now powered with consumer-like customizable forms to deliver satisfactory service to employees.
The need of the hour is to provide uninterrupted quality service yet keeping the cost constraint in mind. ServiceNow is transforming Customer Service into a Team Sport. Unlike CRM(Customer Relationship Management) which is limited to customer engagement, ServiceNow Customer Service Management (CSM) operates by Connecting the right people, systems and workflows.
Customer Service is not limited to just resolving customer tickets. Whenever a customer is facing an issue, we need to find its root cause. This will reduce case(tickets) volume in the long run. ServiceNow comes with Service Mapping which provides cross-functional information to discover the initial point where the error was first noticed.
ServiceNow makes it easy to dispatch across different departments like engineering, field services, legal, etc. Take the example of the coffee maker that’s not working. The field agent is notified of its possible problem even before he starts his conversation with the customer. The customer is notified proactively with real-time notifications ensuring customer satisfaction and resolving issues at lightspeed.
ServiceNow comes with a drag and drop approach which allows you to customize Business Apps without writing a single line of code. For the experienced developer, you will never have to start from scratch again as you can choose from reusable components, workflows and link barriers across departments using information from the cloud.
Let’s now move ahead in this what is ServiceNow blog and understand what is a PDI.
PDIs are meant for a walkthrough of the ServiceNow features. It can be used by developers, customers or even partners. The motive behind this instance is, it does not interfere with the production instance. Application ideas can be tested on PDI’s however, it will not be added to the final application repository.
Instances may be kept as long as there is regular activity. To be considered as active you need to either create applications or write scripts within 14 days. Now that we are aware of PDI’s, let’s move ahead and explore the ServiceNow Platform.
To request a personal developer instance, the ServiceNow developer program provides you with a fully-functional instance, sized for single developer use. Let’s explore the two options to request a personal developer instance.
Step1: Log into the developer site at https://developer.servicenow.com.
Step2: Request a PDI by doing any of the following actions.
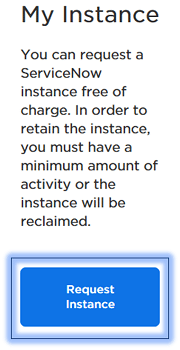
From any page on the developer site, navigate to Manage >> Instance and click Request Instance.
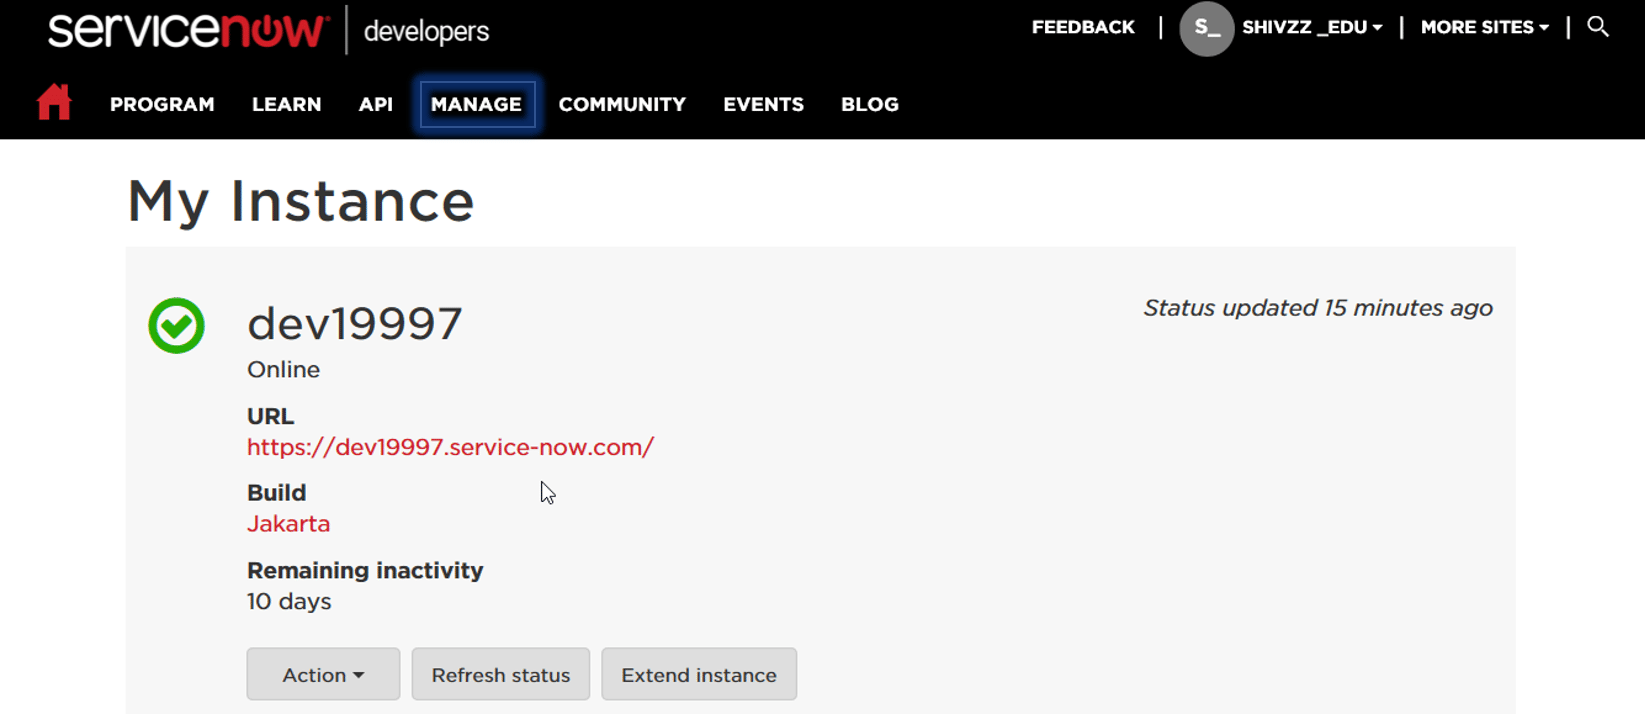
On successful registration, you will get an instance copy as shown above. You can click on the URL and login with your credentials.
To get in-depth knowledge, enroll for a live free demo on Servicenow Online Training
Businesses from all industries generate thousands of data points every day, but all of that data is meaningless without insight.
Business intelligence (BI) software systems help businesses create meaning from their data by analyzing large swaths of data and presenting it in bite-sized chunks. In this way, data becomes usable, and more and more organizations will adopt BI software to put their data to work. There are many BI vendors to choose from, but this article examines two of the most popular options: Qlik vs. Tableau.
If you’ve already narrowed your software search down to Qlik and Tableau, read on. Otherwise, browse other options using our Product Selection Tool, or click the banner below to get personalized recommendations. Our knowledgeable Technology Advisors will send you a free, no-hassle shortlist of the best BI software for your specific needs. Getting started is easy and takes less than five minutes.Which BI Software Is
Right For Your Business?
Qlik and Tableau are two of the biggest players on the business intelligence software market. Both solutions are high-priced BI systems for enterprise sized businesses. They source data from multiple data connectors to provide businesses with meaningful and actionable insights. In this article, we’ll take a look at two products from Qlik and Tableau: Qlik Sense and Tableau Training Desktop.

Qlik Sense seeks to make data literacy more accessible to everyone in an organization. The software does this by leveraging artificial intelligence (AI) and a user interface that works using drag-and-drop functionality. For businesses that are serious about making data-driven choices, Qlik Sense is a powerful tool.
Tableau Desktop helps users tell stories with data by making it easier to find and share insights. Drag-and-drop dashboard tools let analysts generate graphs and reports for forecasting, spotting trends, and more. Use Tableau’s storytelling features to bring your data to life with slideshow-like capabilities.
While working within the two systems feels quite different, Qlik and Tableau offer many of the same features and support many of the same data connectors. For a more detailed analysis of the two systems, scroll down. Learn More from Tableau Server Training
| Qlik vs. Tableau: biggest differences In general, many users report that Qlik performs faster than Tableau but that Tableau offers a more intuitive user interface (UI). While these experiences vary by user and are subject to change based on the amount of data points being processed, it’s helpful to consider the following differences between Qlik and Tableau. Data visualizations: Both Qlik Sense and Tableau Desktop offer customizable reports. Qlik offers many different view options for visualizing data, which users can build using drag-and-drop features. These visualizations allow a surprising amount of granularity considering how well they summarize large groups of data. While this is good for viewing the same data sources in different ways, some users might find the experience overwhelming. Tableau Desktop prioritizes fast and easy-to-use data visualizations over more aesthetically-pleasing visualizations. This means Tableau also offers a drag-and-drop builder for data visualizations, but these visualizations in Tableau are simpler than those found in Qlik. Tableau also lets users present data analysis as a story, using tools similar to Microsoft PowerPoint to help analysts create narratives and move through slides easily. Data connectors For organizations that use business intelligence, finding a tool that supports a large variety of data connectors is important. That being said, it’s also important to understand how a data visualization system sorts data after being imported. Qlik and Tableau support most of the same data connectors, but they differ the most in how they sort data. Qlik uses an associative engine to help reveal insights that can be easily lost to human error, while Tableau takes a query-based approach to showing data. There’s nothing wrong with either approach, but they are very different. While Qlik focuses more on showing associations between data points to help people develop questions they may not have considered on their own, Tableau focuses on “empowering” the individual user to let them find answers to their own questions. Deployment Depending on your organization’s needs, Qlik and Tableau offer different deployment options. For Qlik Sense, businesses can choose from a selection of software as a service (SaaS), on-premise, or private cloud for software deployment. Similarly, Tableau comes as a desktop, on-premise, or cloud-based solution. For the majority of business needs, Qlik’s SaaS option and Tableau’s desktop option should check most boxes. For larger organizations that require software to be hosted on their own servers, both Qlik and Tableau will work. Security Good cybersecurity practices will only continue to contribute more and more to a company’s long term success. Thankfully, Qlik and Tableau make it easy to practice good security practices. Both solutions support multiple users with role-based permissions, so you don’t have to worry about the wrong people viewing data they shouldn’t be able to access. Organizations lacking the capacity to effectively train all employees on security best practices can rest assured knowing that users can access Qlik and Tableau with a single sign-on (SSO). SSO reduces the risk of employees setting weak passwords, allowing users to access the system with one secure login. For maximum security, system administrators can also enable multi-factor authentication (MFA) as an extra safeguard against weaker passwords. For Qlik, you can set up MFA using Okta, and for Tableau, you can use Duo. Choosing a BI system is time-consuming. We can help. It’s important to compare Qlik vs. Tableau, but that doesn’t necessarily mean your search should end there. If you want to save hours on your search for the right business intelligence solution for you, contact us to request a shortlist of the best software for your needs. |
To get in-depth knowledge, enroll for a live free demo on Tableau Online Training
